

Hinckley Triumph Maintenance and Restoration Part 3: Resurrecting A Barn Find Hinckley
From Mike Grage: Customer Service and Tech Support at The Bonneville Shop and British Iron.
Table of Contents
Pre-Ride Inspection
In part one of this blog series, of Hinckley Triumph maintenance and restoration we pulled our bike out from wherever it was sitting and checked to see if it would run. The next blog to read after that would be the CV carb cleaning blog to get the bike to start and run. Then I wrote part two, which covered the usual brake problems from sitting up and how to repair them. So, this part will address all of the things to check to make sure the bike will continue to start, run, and stop.
There are a number of items to inspect on the motorcycle, but the first thing I suggest inspecting is the frame. These 90’s Hinckley triples use stress member steel backbone frame, with a bolted on rear sub-frame. The main frame needs to be inspected for cracks in the welds around the steering head, the rear sub-frame bosses, and the motor mounts. Generally speaking, peeling or bubbled up frame paint is telltale sign of frame damage. The rear sub-frame can be replaced, but it should be inspected for bends. The easy visual inspection for straightness of the rear sub-frame is making sure the rear fender is centered over the rear tire.
After that, everything on the checklist in the maintenance chapter of the factory service manual should be done. Some of the items were done during the carb cleaning such as the carburetor synchronization, idle speed, and air filter change. Same with the oil and oil filter change.
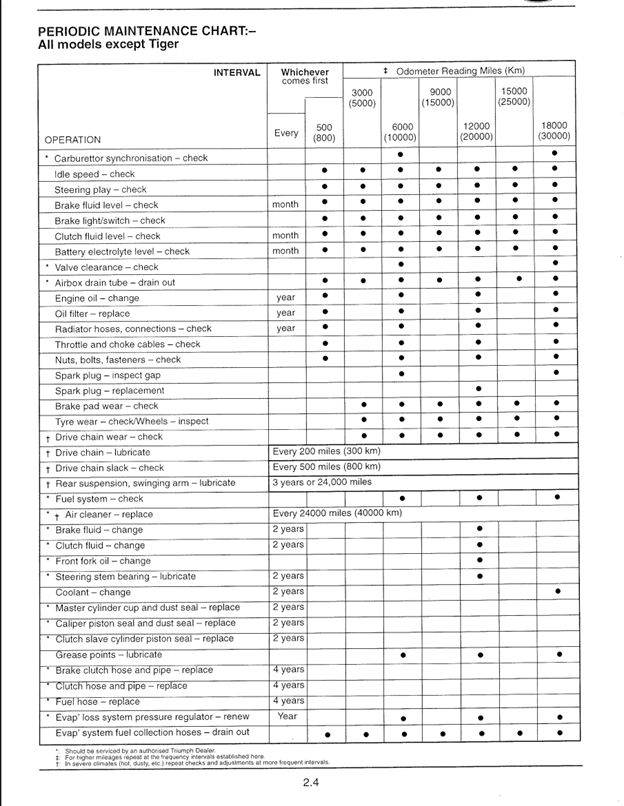
The brake fluid and clutch fluid should have been changed during part two of this blog series. I addressed the carburetors and braking system first because those are the two parts that suffer the most from sitting. Needless to say, you should have a new battery so checking the battery electrolyte should be unnecessary.
Valve clearance check:
The factory service manual provides good instruction on how to perform the valve clearance check and adjustment. When checking the valve clearances, you want to watch for tighter than specified clearances. The factory specifications are .10-.15mm (.004-.006”) intake and .15-.20mm (.006-.008”) exhaust. No clearance, or extremely tight (+/- .001”) can be an indication of a worn valve seat. If a valve has zero clearance you may want to pull the head to inspect the valves and valve seats. Worn valve seats may require purchasing a new/replacement head. Modern British Iron offers the shim replacement tool and replacement shims in various thicknesses, and a full shim kit for those with multiple motorcycles.
PRO TIP: Try not to rotate the engine any more than what is necessary to engage the shim replacement tool. This will minimize the extra stress reverse rotation puts on the cam chain tensioner.
Fork seals/fork tube bushings:
Leaking fork seals and bad fork bushings can cause the forks to stick, and that will make for a dangerous ride. If there is rust on the fork tubes, chances are the seals are going to leak so they should be replaced. Leaking fork seals are rather easy to see, there will be oil on the tubes above the fork seals.
To check the fork tube bushing just grab the fork lower legs and try to move them forward and backwards to see if there is any play between the fork legs and fork tubes. This should be done with the front wheel off the ground on a barn find. There should no play or forward/back movement between the lower legs and tubes. If there is any play a new set of fork tube bushing should be ordered. Please refer to the front suspension chapter of the service manual for seal replacement.
PRO TIP: It is easier to break loose the damper bolt with before removing fork tubes from the triple tree. Which is why I recommend this checking these bushings before lubricating or replacing the steering head bearings.
Steering play check/Steering Stem Bearing Lubrication:
The normal schedule for lubricating the steering stem bearings is every 2 years or 12,000 miles. I recommend doing so if the bike has been sitting for a year or more because grease can dry out. Play in the steering head bearings can be adjusted and the instructions are in the service manual. If they need replacing it is a good idea to use a steering head bearing puller, with a hammer and punch to remove the races pressed into the frame.
While the front wheel is off the ground, you should also check for play (up/down and left/right) in the front wheel bearings. If there is any play or roughness in the rolling action, the bearings should be replaced.
Rear end inspection:
I’ll start with the most obvious thing, that most readers would have already addressed. That is inspecting and/or replacing the chain and sprockets. These motorcycles came from the factory with an o-ring chain. The way an o-ring chain keeps lubricant in the pins is great and leads to longer chain life. But o-rings can dry out and cause binding between the links and rollers or fall out completely.
Personally, I would replace any o-ring chain on a barn find that is more than two years old. Any stiffness can cause the rollers to hang up on the sprockets and wear them out in a short period of time. Too much side deflection will also cause the sprockets to wear out rapidly and has an increased potential to break. Similar to bending a spoon back and forth a few times.
The best way to check the chain is to put the bike on a lift or jack so the rear wheel is off the ground and rotate the rear wheel. If it’s making any popping sounds or hanging up on a sprocket while rotating, replace it. If the up/down deflection is stiff or if it has any tight spots in any area, replace it. Excessive side to side deflection is another issue to check since o-ring tend to fall out after drying out.
And if you can lift a link off the rear sprocket, it’s stretched out and needs to be replaced. Breaking a chain while riding can break engine cases or cause serious injury or property damage. Be sure to have the proper deflection before going for a ride.
For the sprockets we need to check to make sure the teeth are not worn in a way that hangs on the rollers. One that looks like a skill saw blade is dangerous. Also check for burrs on the side. The burrs are an indication of rapid wear in progress.
Another commonly overlooked item are the sprocket carrier rubbers. We need to make sure they are not hard as rock (ready to turn to dust) and that they are not soft and mushy. An easy way to check these with the wheel mounted is to put the bike in gear and see how far you can rotate the rear wheel.
If rotating the rear wheel against the sprocket carrier feels like there are soft springs inside, the rubbers are worn out. If there is zero deflection, and it feels like the sprocket is bolted to the wheel the rubbers are rock hard and about to turn to dust. A knocking sound indicates one or more of the rubbers have turned to dust. The sprocket carrier also has a bearing, so if there is excessive axial (left/right) movement or radial (up/down) movement the bearing will need to be replaced.
While you’re there with the rear wheel off the ground you should make the same checks for axial and radial play in the rear wheel bearings. If there is any axial play when you grab the top and bottom of the wheel and try to rock left and right or lift it up and down new wheel bearings will be needed. Same if there are any rough spots when rotating the wheel.
Next will be the swingarm bearings and shock mounts. If the swingarm has any twisting/turning, up/down, or front/back movement the bearings are worn out and need to be replaced. The swingarm needs to stable. This will also check the rubber mounts for the rear shocks.
Another thing to look for are leaking shock seals, oil on the center shafts will tell you if you have that problem. The shocks should move up and down smoothly.
Hinckley Triumph Maintenance and Restoration: Remaining checks on the list:
The coolant also needs to be changed. Make sure the radiator hoses are not hard or mushy while addressing the cooling system. It is a good idea to follow the service manual instructions for changing the coolant because air will need to be bled from the cooling system. Be patient, getting all of the air bled out of the cooling system can be challenging.
For the cables I like to use a pressure lubing tool like TBS-01-001 to force a good amount of cable lube through the housing to make sure they are clean. Then make sure the cables move smoothly in the housing. Of course, Modern British Iron has the replacement cables needed for the Hinckley triples.
The nuts-and-bolts check is also important. Modern motorcycle engines produce high frequency vibration that is hardly noticeable. That vibration is enough to work engine cover and other bolts, nuts and screws loose. All of the external 6mm bolts are torqued to 6 lbs-ft of torque, or as much strength as it takes to pick up a gallon of water on the end of quarter inch ratchet will do the trick.
The last two items on the list apply to California models only. The EVAP system can cause issues on California models because it uses a couple of solenoid valves to close off the carburetor float bowl vents when the engine is off. A clogged or malfunctioning purge solenoid, roll over valve, or pressure control valve will cause fuel flow problems. Same goes for a full or faulty carbon canister.
Final Thoughts:
All of these checks also apply to any used motorcycle, running or not. You never know if the previous owner has properly maintained the bike.
Frequently Asked Questions
What should I inspect first when restoring a barn find Hinckley Triumph?
Start with the frame. The 1990s Hinckley triples use a steel backbone frame (the frame is a stressed member) with a bolt-on rear subframe. Check for cracked welds around the steering head, the rear subframe bosses and the motor mounts. Peeling or bubbled paint on the frame is a common sign of damage. To check the rear subframe for bends, make sure the rear fender sits centered over the rear tire. Next, work through the maintenance checklist in the factory service manual. This guide follows Part 1: Resurrecting a Barn Find Hinckley, the CV carb cleaning and tuning guide and Part 2: Triumph hydraulic brake restoration.
What are the valve clearance specs for a Hinckley Triumph triple?
Factory specs are 0.10–0.15 mm (0.004–0.006″) on the intake and 0.15–0.20 mm (0.006–0.008″) on the exhaust. Watch for clearances tighter than spec. Zero or nearly zero clearance can mean a worn valve seat, so you may need to pull the head to inspect the valves and seats. Worn seats may mean buying a replacement head. British Iron has the Triumph valve shim removal tool, K&L adjustment shims in a range of thicknesses, and a full 25 mm valve shim kit for anyone working on several bikes.
How do I avoid damaging the cam chain tensioner when adjusting valve shims?
Rotate the engine only as much as you need to engage the shim removal tool. Turning the engine backward puts extra stress on the cam chain tensioner, so keeping rotation to a minimum protects it. The factory service manual has the full valve clearance check and adjustment procedure.
How do I know if my motorcycle fork seals or fork bushings are bad?
Leaking fork seals are easy to spot: there will be oil on the fork tubes above the seals. Rust on the tubes also means the seals will probably leak and should be replaced. To check the bushings, lift the front wheel off the ground, grab the lower legs and try to rock them forward and back. There should be no play at all. If there is, order new fork tube bushings. Shop fork parts in Suspensions, Forks and Shocks and suspension tools.
Should I check fork bushings before servicing the steering head bearings?
Yes. The fork damper bolt is much easier to break loose while the fork tubes are still clamped in the triple tree. Check the bushings and loosen the damper bolts before you take the forks off to grease or replace the steering head bearings. The front suspension chapter of the service manual covers seal replacement.
How often should Hinckley Triumph steering head bearings be greased?
The normal schedule is every 2 years or 12,000 miles. If the bike has sat for a year or more, grease them anyway, because the grease can dry out. Play in the steering head bearings can be adjusted following the service manual. If they need replacing, use a steering bearing race puller plus a hammer and punch to remove the races pressed into the frame. An All Balls steering head bearing kit includes the replacement bearings.
How do I check motorcycle wheel bearings for wear?
With the wheel off the ground, grab the top and bottom of the tire and try to rock it side to side and lift it up and down. Then spin it and feel for rough spots. Any up/down or side-to-side play, or any roughness as it rolls, means the bearings need replacing. Kits like the All Balls front wheel bearing kit for Triumph are available from All Balls Racing.
Should I replace the O-ring chain on a barn find motorcycle?
Mike recommends replacing any O-ring chain on a barn find that’s more than two years old. Hinckley Triumphs left the factory with O-ring chains, but the O-rings can dry out, causing the links and rollers to bind, or fall out completely. With the rear wheel off the ground, spin it. Replace the chain if it pops, hangs up on a sprocket, has stiff or tight spots, has too much side-to-side flex, or lets you lift a link off the rear sprocket. Options include the air-cooled Triumph chain and sprocket kit and the BikeMaster 525 drive chain. For more on wear and sizing, see the motorcycle chains and sprockets guide.
How do I check rear sprocket carrier (cush drive) rubbers on a Triumph?
With the wheel installed and the bike in gear, try to rotate the rear wheel. If it feels like soft springs inside, the rubbers are worn out. If there’s no give at all, as if the sprocket were bolted solid to the wheel, the rubbers have gone rock-hard and will soon crumble to dust. A knocking sound means one or more have already turned to dust. The sprocket carrier also has its own bearing, so any side-to-side or up/down movement means that bearing needs replacing. Browse Clutch, Drivetrain and Transmissions for drivetrain parts.
How do I check swingarm bearings and rear shocks?
Grab the swingarm and try to twist it, lift it and push it front to back. Any movement means the swingarm bearings are worn out. This also tests the rubber mounts for the rear shocks. Oil on the shock shafts means the shock seals are leaking, and the shocks should move up and down smoothly. Pivot Works bearing kits and Hagon shocks are available at British Iron.
What other maintenance does a Hinckley Triumph need after sitting for years?
Coolant: Change the coolant and check that the radiator hoses aren’t hard or mushy. Follow the service manual, because air has to be bled from the cooling system, and getting all of it out takes patience.
Cables: Use a cable pressure lubing tool to force cable lube through each housing, then check that the cables move smoothly. Replacement cables are available, including Venhill.
Nuts and bolts: Check the fasteners. Engine vibration you can barely feel is enough to loosen cover bolts, nuts and screws over time. External 6 mm bolts are torqued to 6 lb-ft.
EVAP system (California models only): A clogged or faulty purge solenoid, rollover valve, pressure control valve or carbon canister can cause fuel flow problems.
Do these checks apply to used motorcycles that already run?
Yes. Every check in this guide applies to any used motorcycle, running or not, because you can’t know whether the previous owner kept up with maintenance. Before you buy or ride a used Triumph, look up open safety recalls by VIN with NHTSA’s recall search and get the factory maintenance schedule from the Triumph owner’s handbook library. To find parts for your model, use Shop by Vehicle or contact British Iron.

