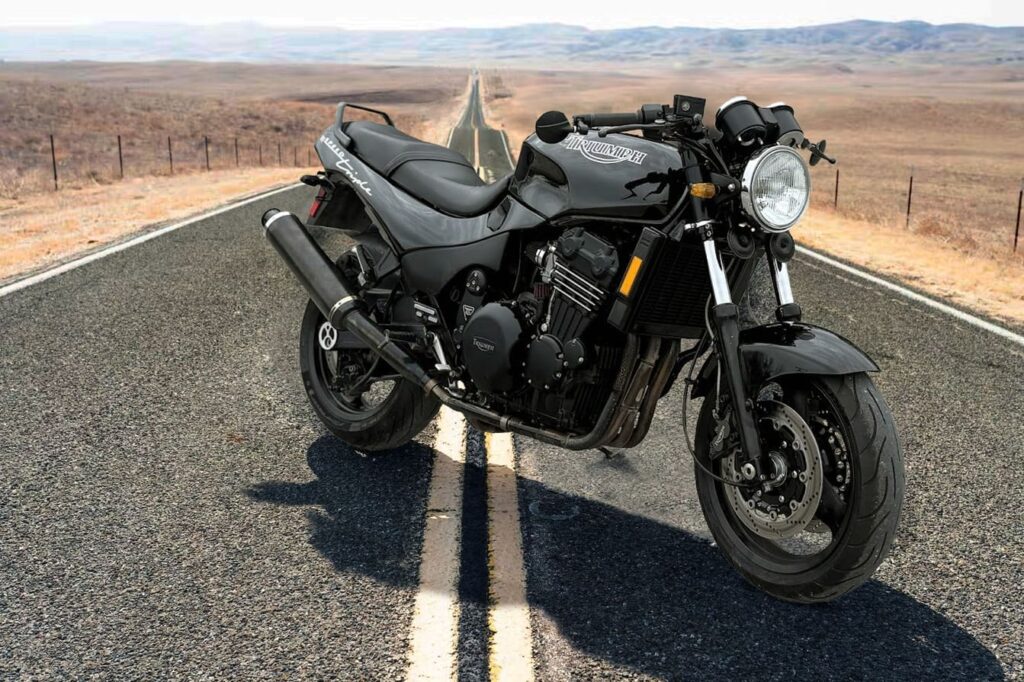
Part 2: Resurrecting a Barn Bike: Hydraulic Brake Restoration (non-ABS)
Triumph Hydraulic Brake Restoration
By Mike Grage: Tech and Customer Support at The Bonneville Shop and British Iron
Table of Contents
This is more of a third part of my restoring a Triumph from the Hinckley factory blog series. The Constant Velocity Carburetor Cleaning/Tuning Tips & Tricks should be considered the second part, but the way oxygenated fuels have been drying up and clogging up carburetors in a month or less since the late 1980’s makes that one more of a stand along blog.
Please have a service manual ready before beginning work on the braking system/Triumph hydraulic brake restoration. You will need it for the correct torque values and other information for your specific model that is not included in this blog. This blog is about tips and tricks I’ve learned through experience and the more experienced technicians that I’ve worked with over the past three plus decades. The methods and advice in this blog apply to all non-ABS hydraulic disc brakes on motorcycles.
Please note that the safety precautions and warnings in this blog and the service manual are no joke. Failing to follow these precautions can result in serious injury or death. Fingers do not grow back. Wear some safety glasses. The Bonneville Shop and Modern British Iron are not responsible for any injuries.
Dealing With Dried Up Brake Fluid
Brake fluid is corrosive so be sure to cover/protect all plastic and painted surfaces that may come in contact with the brake fluid before starting this procedure. If the brake fluid is dried up you should plan on buying new brake hoses, however re-hydrating the system will make rebuilding the master-cylinder and brake calipers much easier. This is the same method for hydraulic clutch master cylinders, but the slave cylinder is quite different from a caliper in design and function. Clutch slave cylinders will be addressed toward the end of the blog because that rebuild process is much simpler.
The DOT 4 brake fluids Triumph uses are primarily comprised of glycol-ethers, which will evaporate and leave a brown and crusty crystalline substance over time. Sometimes it will expand in the caliper and hoses during evaporation causing the brakes to lock up.
The best way to address dried up fluid is to scoop out as much as the crystallized brake fluid from the master cylinder as possible. Then fill it up with fresh brake fluid and open the bleeders and let time and gravity do most of the work. When the brake lever will move use a zip tie to hold the lever in slightly (1/4 inch or so pull). Then let it sit for a couple of days. The fresh fluid will rehydrate the remaining dried-up fluid in the system and gravity will drain it out the bleeder. You will have to top off the master cylinder reservoir a couple of times.
After the brake system is re-hydrated it is important to flush the system a couple of times. The best method for doing this is to fill and drain the brake fluid until the fluid coming out of the bleeder is clean. This will make it easier to replace the caliper seals and rebuild the master cylinder. This also helps to prevent any scoring in the caliper piston bores and master cylinder bore from dirt and crystalized fluid.
When rebuilding non-ABS brakes, I prefer to make the switch to silicone-based DOT 5 brake fluid. It does not absorb water and is less corrosive than DOT 3 and DOT 4 brake fluid. It is also more heat resistant and does not compress as easily.
Please note: DOT 5 doesn’t work well with ABS brakes. Making the switch to DOT 5 requires fully flushing or replacing the lines and replacing the caliper seals and master cylinder piston cups to remove all traces of DOT 4 fluid.
Master Cylinder Rebuilding
It is always a good idea to rebuild the master cylinder after the system is cleaned and flushed if the reservoir was filled with dried up brake fluid. The process is rather simple whether it’s front or rear, even with remote reservoirs. With the master cylinder removed from the motorcycle, the banjo bolt for the brake line out, and the brake lever out you will need to use a pick to remove the rubber boot on the piston.
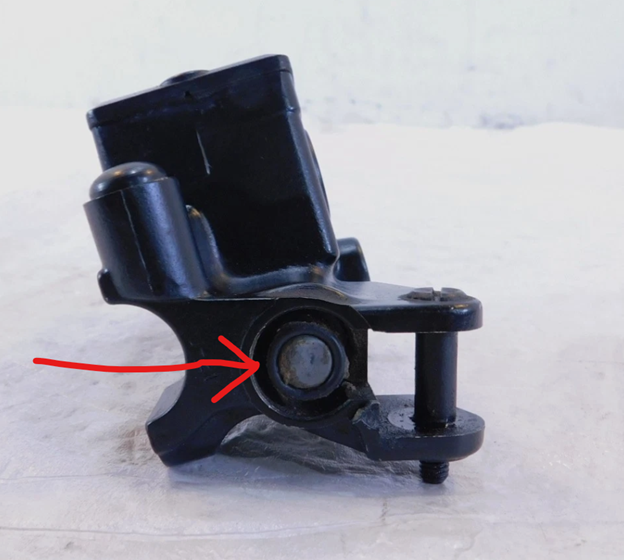
Underneath that boot is a snap ring. To remove the snap ring, you will need a pair of snap ring plier skinny enough to fit between the piston and master cylinder body. I have pair that were modified with a bench grinder that I only use for this job. Chances are the snap ring will be rusty, a little difficult to get out of the groove, and they tend to break.
Just about every master cylinder rebuild kit has a new snap ring. After the snap ring is removed the piston and seals should slide out. In a brake system that had dried up fluid you may need to force it out with compressed air. Just wrap a rag around it to catch the piston and put a shot of air into the banjo bolt hole.
Warning: Use a shop rag or other method to catch the master cylinder piston assembly when using to compressed air. DO NOT USE YOUR HAND! The piston can become a projectile and cause serious damage to people or property.
Once the piston and seals are removed it is a good practice to run a ball hone through the master cylinder bore. Use brake clean and compressed air to remove dirt and debris. Make sure the fluid ports from the reservoir are clear. Then visually inspect it for pitting or other internal damage that may prevent a good seal. Then make sure the piston cups and seals are coated with brake fluid while reassembling the master cylinder. The two details to pay attention to are making sure the snap ring is fully and properly seated, and that the new dust boot is properly seated in its’ grooves.
This is the same method for rebuilding clutch master cylinders.
Caliper rebuilding
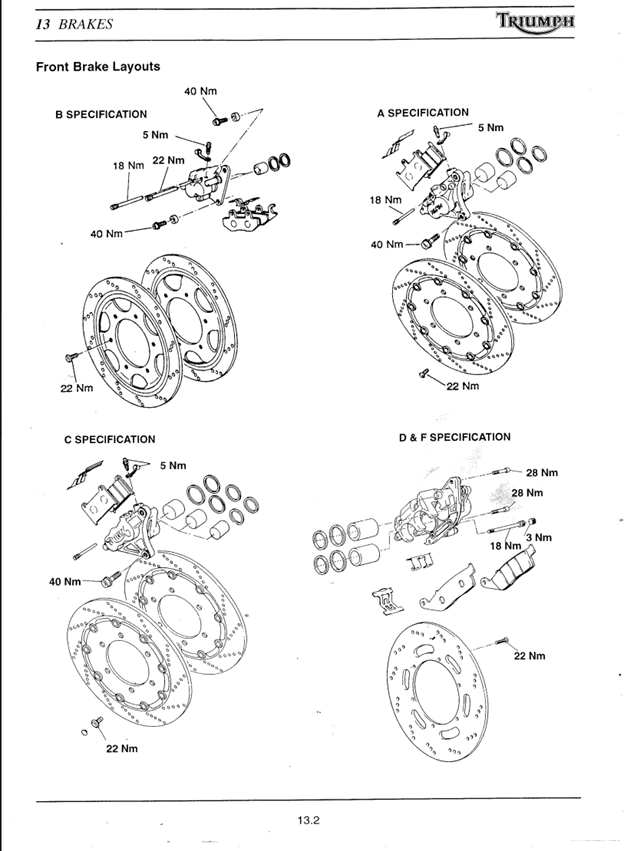
It is important to identify what type of calipers you are dealing with since the two types of calipers that require different methods for rebuilding and unseizing. Those types are floating caliper (has solid fixed rotor) and fixed caliper (has rotor on bobbins and rattles). The Triumph service manual for the 1993-1997 Adventurer/Thunderbird/Sprint/Daytona has four different front brake layouts and three rear brake layouts. All of the rear brakes are floating calipers, however some of the front brakes (Daytona/Speed Triple) have fixed calipers on the front.
In the service manual, front brakes A & C specification are fixed calipers. B, D, & F are floating calipers.
Fixed Caliper Rebuilding
Fixed calipers (ex: Daytona/Speed Triples front) have pistons on opposing sides and use a rotor with a number of grommets/bobbins that allow the rotor to move slightly to allow full contact with pads when the brake is applied. If these calipers are locked on to the rotor due to dried up fluid, plan on getting new rotors. You will more than likely have to hit the rotor with a dead blow hammer or use a pry bar to retract the pistons enough to remove the caliper, even after re-hydrating the hydraulic system.
Either method tends to bend or warp the rotor. A bent or warped rotor will prevent a fixed caliper from staying pumped up when riding and has the potential to cause the front wheel to suddenly lock up. I have ridden many bikes with warped rotors to diagnose braking problems, and that test ride is not fun.
Since fixed calipers are two pieces, they require you split the caliper to replace or reseal the pistons. You can use the hydraulics to pump out the brake pistons after the hydraulics are re-hydrated, or use compressed air to pop them out before splitting the caliper. Keep in mind that pumping the pistons out with the hydraulics will make a mess. But if one or more of the four or six pistons is stuck in the bore, you will need to use c-clamps and compressed air to get it out.
Warning: Keep your fingers clear of the pistons when using compressed air to remove the pistons in a fixed caliper. They will pop out and it will sound like someone shot a gun. The opposing pistons colliding between the caliper halves have the potential to flatten your finger or cut it off. Place a rag between the pistons to prevent or minimize damage to the pistons.
A pair of stuck pistons on one side of a fixed caliper will look like what’s in the photo below.
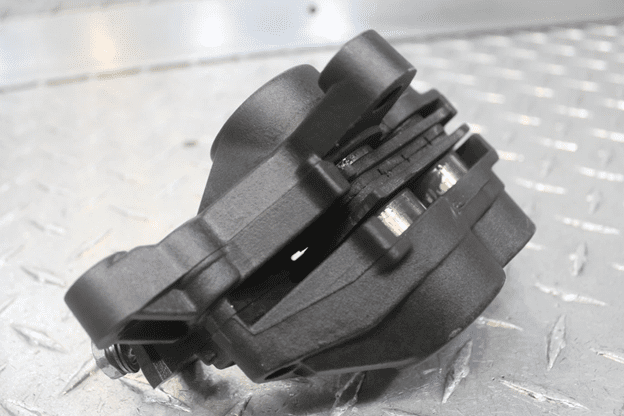
The best way to deal with the caliper in the photo is to fully seat the two pistons that are sticking out farther, and use a c-clamp and old pad to hold them in place. Then close the bleeder and make sure your fingers won’t get caught between the pistons. Place a shop rag between the pistons to minimize the potential for damage when the pistons collide. Then use a rubber tipped air nozzle and give a blast of compressed air into the banjo bolt hole.
If one piston pops out and the one next to it did not move, you will need to put the piston back in the bore and use another clamp to hold it in place and try to pop the stuck one out with compressed air. This is the same method for 6 piston calipers. You may want to buy a new caliper because this process can be a frustrating game of whack a mole.
Once the pistons are as far out of the bores as you can get them, you will need to remove the bolts holding caliper halves together to fully remove and inspect them and their bores. Next step will be cleaning the pistons and piston bores. After cleaning look closely for rust or pits on the pistons and scoring in the caliper body. Damaged and rusty pistons will need to be replaced. Any damage or scoring to the bores will cause the pistons to stick or leak, the only fix for damaged piston bores is replacing the caliper.
After the caliper and pistons are cleaned up the next step is to replace the piston seals, and the seals between the caliper halves. When replacing the seals for the pistons you need to make sure both the pressure (inside/large) and wiper (outer/small) seals are fully seated with your fingers. Then make sure the pistons and piston seals are coated with brake fluid when re-installing them into the caliper. They will have some resistance, but the movement should be smooth when pushing the pistons back into the caliper bores.
Once the pistons are fully seated in the caliper, check to see if you can turn them with your fingers (there will be some resistance) to make sure they will not stick in the bore. Then replace the seals between the caliper halves and bolt them together and torque the caliper half bolts to 18 lbs.-ft. (or 25Nm).
At this point the fixed caliper is rebuilt and ready for reinstallation.
Floating Caliper Rebuilding
Floating calipers have one or more pistons on one side only. These are the most common type of disc brake caliper. Another less common name for them is sliding calipers. The reason for both names is that when the brake is applied the pistons cause the caliper body to slide on a pair of pins so it can apply even force on both brake pads.
The first thing to check on these calipers is how they slide on the pins. If the caliper body or pins are damaged to point that it can’t slide, they will need to be replaced. When the caliper gets stuck on the slider pins the caliper pistons will not retract properly and will cause premature and uneven wear on the brake rotor and pads. So, when dealing with the brakes on a ‘ran when parked’ bike it is important to slide the caliper off of the pins to clean and lubricate them with a light coat of grease.
Once the pads are out and the caliper is off the disc it should slide off the pins with minimal resistance. Pay close attention to the sliding action of the caliper on the bracket, it should move smoothly. After it is removed check the condition of the slider pins and boots. Dirty rusty pins can be cleaned up, re-lubed, and reused.
The caliper will need to be replaced if there is noticeable/excessive play between the caliper body and caliper pins. Ripped slider pin boots will allow dirt and brake dust to accumulate on the slider pins and cause the caliper to seize or hang up on the pins. You should replace ripped boots whenever possible. Triumph does not list replacement boots for all of their floating calipers, but some are available like the T2020697 boot set for Rocket IIIs and Daytona 675 rear brakes are available.
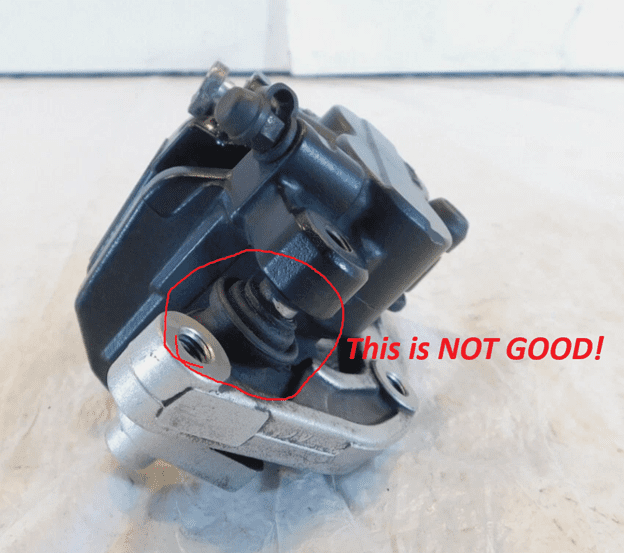
Checking the movement of the caliper on the pins is something that should be done anytime work is done on the brakes. Even if you’re just changing the pads. On a good functioning floating caliper, you will be able to smoothly push the caliper all the way in (fully retracting the pistons) with a moderate amount of force, and then be able to see the caliper move smoothly while the brakes are being pumped up.
The next step will be removing the pistons and replacing the seals. The pistons can be pumped out hydraulically. When pumping them out be sure to have the caliper in a drain pan or other container because this will make a mess. They can be forced out using compressed air.
Warning: Watch your aim when using compressed air to pop pistons out of a floating caliper. There is nothing to stop them from shooting out of the caliper like a shotgun slug. Doing this improperly will cause property damage, injury, or death.
This should be done on the shop floor, so the pistons won’t fly off out of control. Loosely wrap the caliper in a shop rag leaving the banjo bolt hole exposed. Place it on a length of wood, preferrable a 2×4 stud. Get a good grip on the caliper, holding it down on the wood and in a position so the pistons are aimed directly at the wood. Make sure your fingers are out of the way of the pistons.
Press your rubber tipped air nozzle into the banjo bolt hole and give it a blast of air. If one piston comes out and the other is stuck: push the piston back in the bore and secure it in place with a c-clamp. Then use compressed air to pop the other one out and watch your fingers.
Next step will be cleaning the pistons and piston bores. After cleaning the caliper with brake clean look closely for rust or pits on the pistons and scoring in bores in the caliper body. Damaged and rusty pistons will need to be replaced. Any damage or scoring to the bores will cause the pistons to stick or leak, the only fix for damaged piston bores is replacing the caliper.
Next step is to replace the piston seals. When replacing the seals for the piston you need to make sure both the pressure (inside/large) and wiper (outer/small) seals are fully seated. Then make sure the pistons and piston seals are coated in brake fluid when re-installing them into the caliper. They will have some resistance going back in, but the movement should be smooth when pushing the pistons back into the caliper bores. Once the pistons are fully seated in the caliper, check to see if you can turn them with your fingers (there will be some resistance) to make sure they will not stick in the bore.
With new piston seals and cleaned up and lubed slider pins the caliper is ready for reinstallation. Make sure the caliper slides/floats on the pins after the bolts are tightened to ensure full functionality.
Clutch Slave Cylinders
You should always have a couple of zip ties or safety wire handy when unbolting the clutch slave cylinder from the motorcycle because there is a spring behind the piston that will push it out of the cylinder body. New hydraulic clutch slave cylinders come from the factory with zip ties to prevent the piston from leaving the body during storage. All clutch slave cylinder rebuild kits include a replacement spring because spring is essential for keeping the clutch properly adjusted.
There are a couple of bad conditions that will prevent the piston from slowly sliding out of a clutch slave cylinder body. One is if the piston is cocked in the body, like in the photo below.
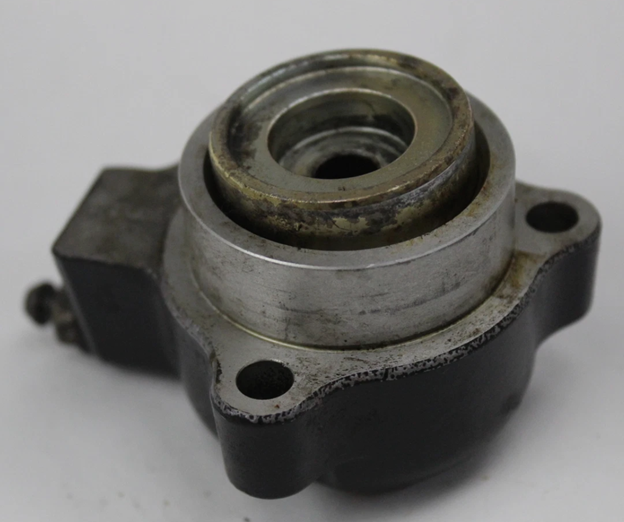
The piston should be square to the bore in the body. You may be able to straighten that one out in the bore and let the spring push it out naturally, but chances are it damaged the slave cylinder body.
With slave cylinders you need to inspect the piston and bore in the body for pitting and scoring. Make sure the bore is clean when replacing the piston, seal, and spring. One trick I’ve learned with replacing one is to close the bleeder and seal off the banjo bolt hole with your thumb to keep the piston in the cylinder, slide it into its bore in the cases on the clutch pushrod and gently seat one of the bolts.
Next install the other two and torque according to the service manual. Then connect the hydraulic line and open the bleeder. Gravity will bleed the hydraulics naturally, simply wait until you have a steady flow of fluid dripping from the bleeder and then close it.
Frequently Asked Questions
How do I fix dried-up brake fluid on a motorcycle that’s been sitting?
Scoop as much of the crystallized fluid out of the master cylinder as you can, fill it with fresh brake fluid, and open the bleeders so gravity can do most of the work. Once the lever moves, zip-tie it about 1/4″ in and let the bike sit for a couple of days, topping up the reservoir as needed. The fresh fluid rehydrates the old deposits so they drain out the bleeder. Then flush the system a couple of times, until clean fluid comes out of the bleeder. Brake fluid is corrosive, so cover paint and plastic first. If the fluid dried up, plan on buying new brake hoses too. Find hoses and parts from Goodridge and in Brakes.
Why do motorcycle brakes lock up after sitting for years?
The DOT 4 fluid Triumph uses, is mostly glycol ethers. Over time it evaporates and leaves a brown, crusty, crystal-like residue. As it dries, that residue can expand inside the calipers and hoses and lock the brakes. Rehydrating and flushing the system before you take anything apart also helps keep dirt and crystals from scoring the caliper and master cylinder bores.
Can I switch my Triumph from DOT 4 to DOT 5 brake fluid?
On non-ABS brakes, yes. Mike prefers silicone-based DOT 5 when he rebuilds non-ABS systems: it doesn’t absorb water, it’s less corrosive than DOT 3 and DOT 4, it handles heat better, and it doesn’t compress as easily. DOT 5 doesn’t work well with ABS. To switch, you need to fully flush or replace the lines and replace the caliper seals and master cylinder piston cups, so no DOT 4 is left in the system. The federal standard for each fluid grade is in FMVSS No. 116 (49 CFR 571.116).
How do I rebuild a motorcycle brake master cylinder?
With the master cylinder off the bike and the banjo bolt and lever removed, pick out the rubber boot, then remove the snap ring with thin snap ring pliers. The snap ring is often rusty and may break, but almost every rebuild kit includes a new one. Slide out the piston and seals or use compressed air through the banjo bolt hole if they’re stuck. Run a 14 mm master cylinder hone through the bore, clean it with brake cleaner and compressed air, make sure the reservoir ports are clear, and check for pitting. Coat the new cups and seals with brake fluid as you reassemble and make sure the snap ring and dust boot are fully seated. For the parts, see the Triumph front master cylinder rebuild kit.
Is a clutch master cylinder rebuilt the same way as a brake master cylinder?
Yes. Rehydrating dried fluid and rebuilding the master cylinder work the same way for a hydraulic clutch master cylinder. The K&L clutch master cylinder rebuild kit for Triumph has the seals you need. The clutch slave cylinder is different, and its rebuild is simpler.
How do I tell if my Triumph has fixed or floating brake calipers?
A fixed caliper has pistons on both sides and works with a floating rotor mounted on bobbins, which rattles slightly. A floating (sliding) caliper has pistons on one side only, slides on a pair of pins and uses a solid rotor. On the 1993–1997 Adventurer, Thunderbird, Sprint and Daytona models, every rear brake is a floating caliper. Some front brakes, like those on the Daytona and Speed Triple, are fixed calipers. In the service manual, front brake layouts A and C are fixed, and B, D and F are floating.
Do I need new rotors if a fixed caliper is seized on the rotor?
Usually, yes. Even after you rehydrate the system, getting a seized fixed caliper off usually takes a dead-blow hammer or a pry bar. Either one tends to bend or warp the rotor. A warped rotor keeps a fixed caliper from staying pumped up and can make the front wheel suddenly lock. Replacements include the EBC front brake rotor (MD800X), and more rotors are available from EBC and Galfer USA.
How do I remove stuck pistons from a 4- or 6-piston fixed caliper?
Push the pistons that are sticking out farthest all the way in and hold them with a C-clamp and an old pad. Close the bleeder, put a shop rag between the opposing pistons, keep your fingers clear, and blow compressed air into the banjo bolt hole with a rubber-tipped nozzle. If one piston pops out and its neighbor stays put, push the loose one back in, clamp it, and try again. Then split the caliper halves, clean everything, and check for rust, pitting and scoring. Damaged pistons need replacing, but a scored bore means a new caliper. Fit new pressure and wiper seals and new seals between the halves, then torque the caliper half bolts to 18 lb-ft (25 Nm).
Is it safe to use compressed air to remove brake caliper pistons?
Only with precautions, because the pistons come out with real force. In a fixed caliper, the opposing pistons can slam together hard enough to crush or cut off a finger, so keep a rag between them and your hands clear. A floating caliper has nothing to stop the piston, so it can shoot out like a shotgun slug. Work on the shop floor with the caliper wrapped loosely in a rag and the pistons aimed down at a 2×4. Never catch a piston with your hand and always wear safety glasses. For the right tools, browse wheel and brake tools.
Why are my floating caliper brake pads wearing unevenly?
When a floating caliper sticks on its slider pins, the pistons can’t retract properly, which wears the pads and rotor early and unevenly. Slide the caliper off its pins, then clean them and give them a light coat of grease. Dirty or rusty pins can be cleaned and reused. Excessive play between the caliper body and the pins means a new caliper. Replace torn slider pin boots, such as the T2020697 boot set for the Rocket III and the Daytona 675 rear brake, wherever replacements exist. Check that the caliper slides freely every time you work on the brakes, even for a pad change.
How do I know if a brake caliper needs to be replaced instead of rebuilt?
After cleaning, look closely at the pistons and bores. Rusty or pitted pistons can be replaced. Scoring or damage in a piston bore makes pistons stick or leak, though, and the only fix is a new caliper. Also replace a floating caliper with excessive play on its pins, or a fixed caliper whose stuck pistons turn into an endless game of whack-a-mole. Once a rebuilt caliper is back together, you should be able to turn each piston with your fingers, with some resistance.
How do I rebuild a Triumph hydraulic clutch slave cylinder?
Have zip ties or safety wire ready before you unbolt the slave cylinder, because a spring behind the piston pushes it out. Check the piston and bore for pitting and scoring. A piston that’s cocked in the bore has probably damaged the body. Clean the bore and fit a new piston, seal and spring from a Triumph clutch slave cylinder rebuild kit. The spring matters because it keeps the clutch properly adjusted. To refit it, close the bleeder, cover the banjo hole with your thumb, slide the cylinder onto the clutch pushrod, and torque the bolts to the service manual spec. Connect the line, open the bleeder, and let gravity bleed it until fluid drips steadily. This guide follows Part 1: Resurrecting a Barn Find Hinckley and leads into Part 3: Hinckley Triumph Maintenance and Restoration. For torque values for your model, see the Triumph owner’s handbook library and your service manual.